Up in horsey heaven here's the thing...
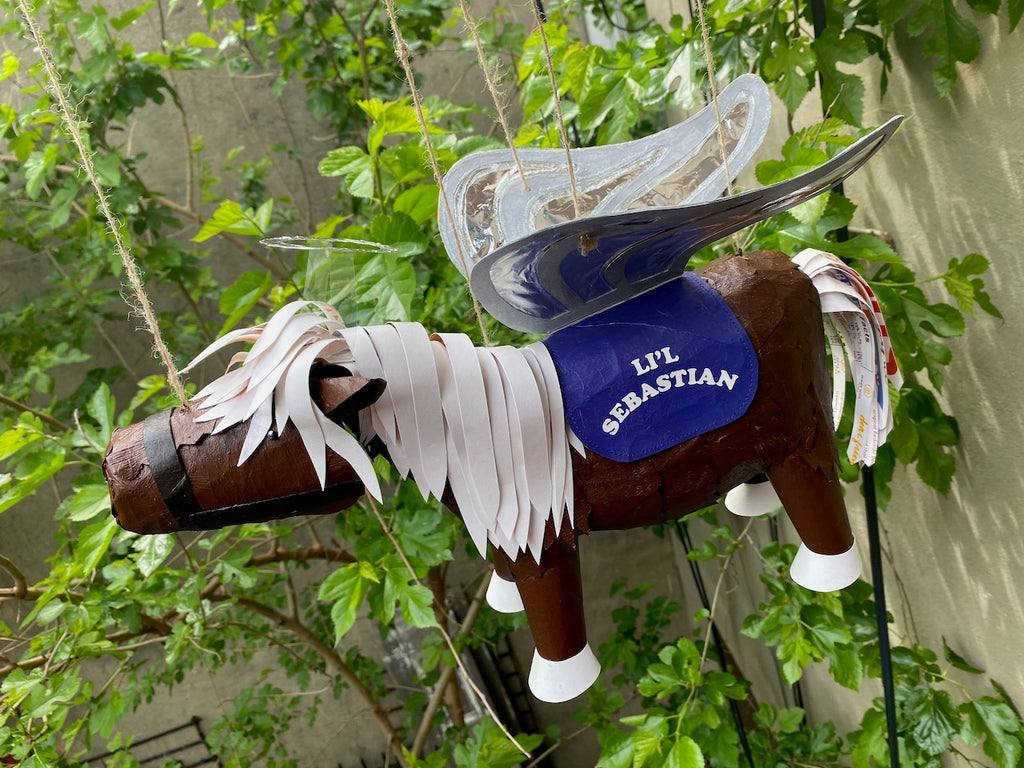
Ever since the Parks and Recreation special, I’ve had Li’l Sebastian’s song stuck in my head nonstop. So when I saw Robert Mahar ‘s amazing horse marionettes I was inspired to create a Li’l Sebastian version!
My Li'l Sebastian marionette is hanging in "Horsey Heaven" for sure. He even whinnies when he raises his head — which is amazing— no matter what Ben thinks. :p


Making It! (Also, how I made it)
I was responding to the #MakingItAtHome prompt. The challenge was to make something awesome out of toilet paper tubes and paper towel rolls. I wanted to transform the tubes into a sculpted form by flattening and manipulating the tubes so that I could utilize their structural strength but still create an organic shape.
My goal was to use the material in a way that you no longer see "toilet paper tube" when you look at the finished project, but still keep the essence and simplicity of the recycled craft tube.
Materials
- Paper Towel Tubes
- The Cardboard Tube core from a roll of fabric
- Toilet Paper Rolls
- Frozen Waffle Boxes
- Craft colored shipping paper saved from Amazon orders
- Aluminum Foil (yup- the stuff in your kitchen right now)
- Packing Tape
- Acrylic Paint thinned with Modge Podge
- Glitter Glue
- Twine
- Paint Sticks (Free from Home Depot when you buy paint)
- Black Beads for Eyes
- Sewing machine & Thread (to make the cape stitching detail)
- Cricut / Silhouette craft cutter (to make the cape text)
For the electronics:
- Recordable greeting card circuit
- Tilt Switch
Tools
- Xacto Blade
- Scissors
- Awl
- Soldering Iron
Creating the main body shape
- First, I printed an image of Li'l Sebastian for reference
- I sketched the size and shape from the side and top. I made sure it was large enough to use the large cardboard tube from the fabric as the interior of the horses body. This would give me space to tie the strings just like Robert's toilet paper tube marionettes. I thought the main body shape looked a lot like a bean!
- I cut a piece of the large tube to size. I used the shipping paper and packing tape to build upon the tube until it resembled the shape.
- I held the sculpture up to the sketch as I built it to make sure that I was creating the correct from the side and top. I cut out the sketch to flip it over and view it from the other side so that I could look for symmetry on both the right and left sides.
- I made the head in the same manner, and attached it with a single piece of paper towel tube at the top to act as a "hinge" and allow the head to be moved up and down independently to the body.
- I shaped the toilet paper tubes into cones to make the legs.
- I added the twine marionette strings by using my awl to poke holes through the back, and tied knots inside the tube to hold it in place.
Draping the horse body
- Li'l Sebastian has short hair, and I wanted to convey the "fuzzyness" of his coat. I created many strips of the tubes and cut zig-zag edges to give a nod to the short haired coat of the horse.
- I started at the back and draped the pieces around the 3D shape, making a part in the center of the back just like Li'l Sebastian's part in his mane. This center line was also helpful later because it was a good indication of the center of the horse, making it easy to align the wings and cape.
- My technique felt a lot like draping fabric onto a mannequin - manipulating the flat material around the curves of the body.
- Draping around the head was particularly difficult.
- I made sure that the sides of the face looked like the shape of a mini horse's jaw, and that the jaw extended to cover around the neck. This would allow the head to move freely on the hinge and still look like it was supported by and connected to the neck.
- I added ears and it really started to take shape!
Painting! (But... I kind-of didn't want to.)
It was really hard for me to paint him - I love craft paper sculptures. There's something about a monochromatic, organic color that makes me swoon. I think it puts the focus on the shape of the object and is really beautiful.
BUT!
I was sculpting Li'l Sebastian, and he is dark brown, and I'd be doing him a disservice by leaving him craft colored. I did snap a few photos of him first before painting tho. :)


- For the paint, I used a combination of Liquitex acrylic paint and Mod Podge. This started as a necessity - my acrylic paint was from art school and I graduated in 2008 (I couldn't believe that it was still liquid at all!) I added the Mod Podge to reconstitute the thickened paint and I'm glad that I did because it gave the project a nice plastic-y sheen that looked really nice.
- I made sure to tie up the twine before painting so that I didn't get paint on the strings!
Sculpting the horsey hair
- I used freezer waffle boxes for the hair. I actually really like to use the boxes that Vans waffles come in for crafts - it's a nice sturdy material that's halfway between cardstock and chipboard. It's plastic coated on one side and matte on the other, so the matt side can take paint, ink, etc. Plus, although it has a recycling symbol on the box, it doesn't list a recycling number, so I'm pretty sure that it can't actually be recycled. So Up-cycling it is!
- I cut many strips of the boxes to make the hair. I had a lot of fun sculpting and trying to capture the straight "Justin-Bieber" - like bangs that Li'l Sebastian is known for. I used hot glue to hold each strand down in a specific place. Just call me the horsey hairstylist.


And now, Some Wings!
- I drew a wing shape onto the waffle box paper and cut it out.
- Then, I traced my design to make another wing shape, and then flipped it over to trace 2 mirror image wing shapes for a total of 4 wing pieces. I cut them all out.
- I painted all the pieces with silver acrylic paint.
- While they were drying, I made the tail by cutting strips of the waffle boxes.
- Then I glued the painted wing pieces on either sides of a piece of aluminum foil so that the foil would fill in the holes with silvery shine! (The assembly order was: a wing regular shape, then foil, then a mirror image wing shape on the back).

Making the Cape
- I cut the cape shape out of a paper towel roll and painted it purple.
- While I was waiting for it to dry, I added white hooves to the ends of the legs, and added beads for eyes. On each bead, I painted a white highlight to make the eyes glisten.


- I used my Cricut cutter to cut the letters for the cape. I looked at Ben's "Li'l Sebastian" t-shirt as an example for choosing the typeface
- I also sewed an edging around the cape piece once it was dry to give it the feeling of being fabric. I had considered using actual fabric for the cape, but I thought it strayed too far from the cardboard feel of the rest of the project, so adding the simple stitching to the toilet paper roll material was a good solution.


Making the marionette interactive
- I drilled holes in three paint stir sticks and made two of them into a cross. I cut down the length of the cross beam to make it less wide - it only needed to be as wide as the wings. I was surprised that I was able to cut through the paint stick with my craft scissors and didn't need to get out a saw!
- I tied the strings to the sticks so that lifting the top stick's front would raise the head and lifting its back would flap the wings. The other stick was connected to the support strings on the neck and rear to hold the body.

- To make Li'l Sebastian whinny when he raises his head, I soldered a tilt switch in place of the button on a recordable greeting card circuit.
- I taped the tilt switch to the rest of the circuit and inserted it inside Li'l Sebastian's head so that it would activate when the head was raised. I was happy that I got the angle right on the first try! Score!


Adding Li'l Sebastian's "Halo"
- To make the halo, I cut a ring from the waffle boxes and covered it with tin foil using a glue stick.
- I used some scraps from the Dura-Lar plastic that we were using to make face shields to suspend the halo above Li'l Sebastian's head.
Time to play with my new Li'l Sebastian Marionette!
- Here's a shot of him in action!

Please let me know what you think of my Li'l Sebastian in Horsey Heaven Marionette in the comments below. :)