

Introduction
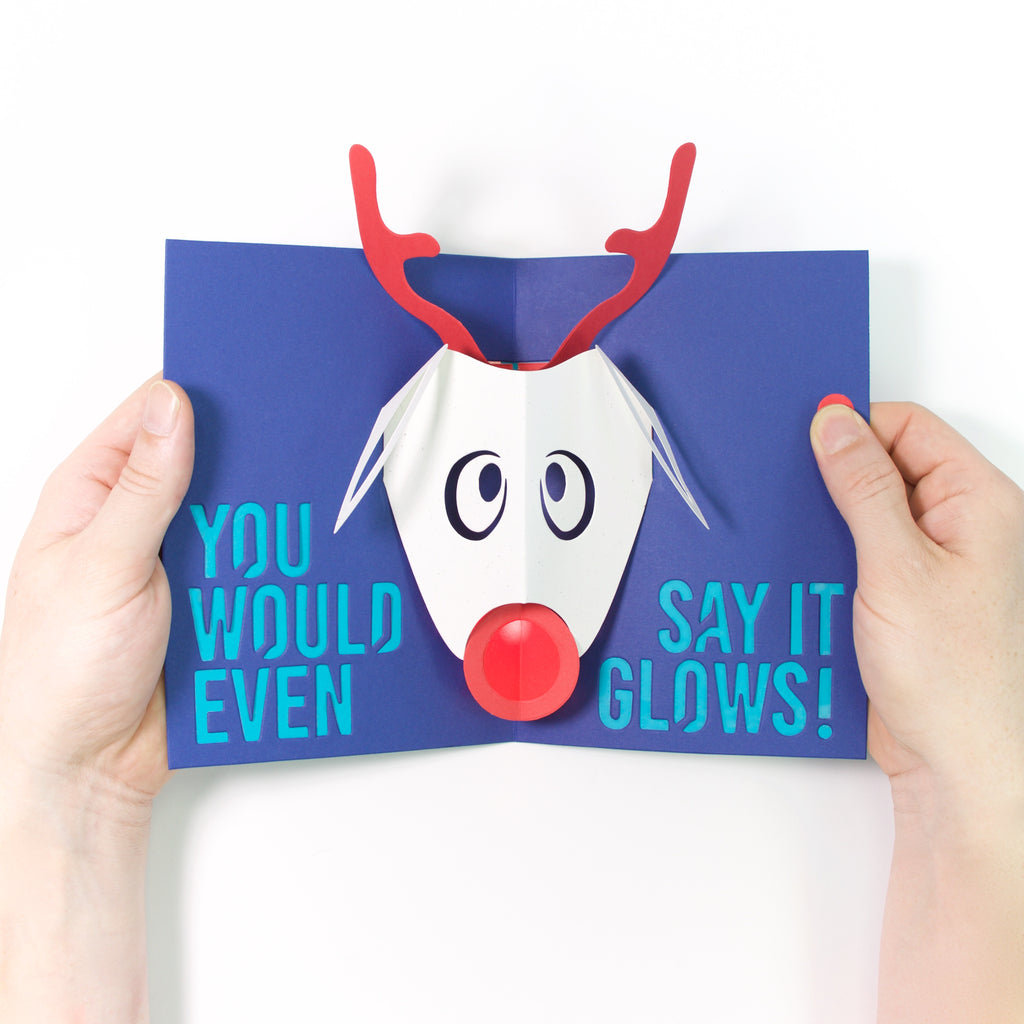
How do you have a great christmas? Follow the nose! Craft this light-up pop-up version of the classic christmas story. You would even say it glows.

Supplies:
- TechnoChic Light-Up Pop-Up Card Kit: Rudolph
- Clear Tape
- Glue Stick
- Scissors
- Scrap Paper to Protect Table From Glue
- (Only if you live outside the USA:) CR2032 or CR2025 Battery
Optional Supplies:
Instructions:
Take out this piece:

Fold back and forth on each vertical score line to make it easier to fold

-
Cut a pice of copper tape about 1 inch long
-
Peel off the white backing of the copper tape
-
Stick to the paper as shown, making sure it doesn't go over the edges of the paper

-
Flip the piece over

-
Stick another 1 inch piece to the other side as shown

-
Put a piece of scrap paper down
-
Apply glue to half of the outer circle as shown; stop at the fold line

-
Fold the shape - match the glued part with the circle in the center
-
Remove any excess adhesive

-
Push the right edge of the paper so that it folds into a box

-
It should look like a box from the bottom

-
Apply glue to the outer half of the shield-like part

-
Fold it over to align the glued half with the matching half shield

-
The front should look like this:

-
A correctly folded nose should be able to flatten to the right...

-
The left...

-
and fold flat at the center

-
Take out the front of the card

-
Apply glue to the entire back of the nose

-
Place it in the center fold, aligning the bottom of the nose with the bottom of the card

-
Close the card and press on the bottom where the nose is

-
Open the card; check to be sure the nose is completely adhered and centered

- CONSTRUCT THE CIRCUIT -
The first part of the circuit instructions include diagrams with explanations and tips, the second part is a step-by-step building guide with photography.
A Simple Circuit: Battery, Switch, LED
-
The battery will be placed on the top right corner. The positive side touches the copper tape on the right.
-
The switch is a break in the copper tape and a patch to bridge the gap when the paper is squeezed.
-
The LED is placed on the vertical structure inside the nose with the positive side (the longer wire on the LED) on the right. Electricity travels through the LED to the other side of the paper and continues around to the negative side of the battery.

Reinforce it!
-
The arch enemy of pop up paper circuits is an unwanted break in the copper tape.
-
Reinforce the easily breakable parts with extra copper tape and clear tape.

Check your work
-
Remember to install the battery with the positive side up (there's a "+" on the positive side).
-
Don't forget to fold the small flaps on the switch flap before folding over.

Find the sweet spot
-
Install the binder clip evenly between the two pieces of copper tape so that both the positive and negative sides of the battery have a good connection.
-
Seeing a blinking light? Try readjusting the binder clip.

Ok, Back to Reality!
-
There is a small horizontal line on the right side near the bottom flap
-
Measure a piece of tape starting from that line to the top of the top flap

-
Cut to size

-
Peel about 1/2 inch of the backing off the copper tape
-
Position the end at the small horizontal line

-
Peel the backing off slowly while guiding the tape into place

-
Measure a length of tape that's the width of the card just before the fold

-
Use the bottom of the small horizontal line as a guide
-
Be sure to stick the tape just below the line, making sure they DO NOT touch each other (This gap is for the switch)

-
Cut a small piece to go on the switch flap

-
Apply as shown

-
Fold the flaps up and down

-
Fold the entire flap over

-
Measure a piece long enough to be parallel to the piece on the nose, and connect to the horizontal piece.
-
Tape it down

-
Take out the LED, hold it with the longer wire (the positive side) on the right

-
Place the LED inside the nose over the center paper so that the longer wire is on the right side and the short wire is on the left
-
It should rest on the flat edge, with the wires on top of the copper tape piece from the first step

-
Cut three pieces of tape, about 1 - 1.5 inches long

-
Bridge the connection between the LED and the vertical piece of copper tape
-
Be sure that the LED's wire is sandwiched between the copper tape on the red paper and the new piece to make a good connection

-
Apply two more pieces to ensure a good connection

-
Reinforce the connections with clear tape as shown

-
Push the nose to the other side
-
Measure a piece starting parallel to the copper tape on the nose, long enough to rise above the strip on the right

-
Stick it in place

-
Cut three more pieces 1 - 1.5 inches long

-
Apply all three to bridge the gap between the copper tape on the nose and the vertical piece on the left
-
Again, make sure that the LED's wire is sandwiched between the copper tape on the red paper and the new piece to ensure a good connection

-
Reinforce these connections with tape

-
Measure a piece long enough to travel almost all the way across; stopping just before the vertical strip on the right

-
Apply as shown

-
Measure and cut a piece to reinforce the tape as it travels over the center crease

-
Apply as shown

-
Reinforce with tape

-
Measure a piece to travel vertically, stopping just before the fold

-
Cut and apply as shown

-
Reinforce with tape

-
Fold the top right flap to cover the copper tape on the right
-
Take out the battery

-
Place the battery positive side up on the flap, with the bottom touching the copper tape on the left

-
Fold the top flap over the battery

-
Use the binder clip to secure it in place

-
Test your circuit by pressing the switch flap down
-
Congrats! You have completed the circuit!

Didn't light up?
- Make sure the electricity has an uninterrupted path from the positive side of the battery to the negative when the switch is closed.
- The switch makes a good "bridge" between the gap in the copper tape ( try bridging the gap with a scrap piece of copper tape).
- Check that the LED has a good connection to the copper tape, and be sure that the tape is not going over the paper to connect to the other side creating a short circuit.
- Be sure the battery is installed with the "+" facing up - if the circuit works with the bottom facing up, the LED is in the wrong way and needs to be installed with the long wire on the right.
- ... more troubleshooting coming soon!
- HOME STRETCH: ASSEMBLE THE CARD
-
Put down a scrap piece of paper
-
Apply glue to the perimeter of the card, including on top of the switch and below the nose
-
Use a cotton swab to apply glue to the tight places if you have one

-
Open the dark blue paper
-
Slowly place it over the nose

-
Press down on the perimeter of the card to connect with the glue

-
Turn the card over
-
Before the glue sets, make sure the border is even and reposition if needed
-
Remove any unwanted adhesive

-
Turn the card back over

-
Apply glue to the outer triangles, stopping at the score lines

-
Fold the antlers in half with the glue on the outside

-
Position the antlers inside the triangle, with the flat bottom aligned with the center fold of the card
-
Make sure that the antlers are not sticking out above the card

-
Close the card and press down where the triangles are

-
Open the card, the antlers should be aligned and popping up

-
Take a moment to press down on the glued triangles below to ensure a good hold

-
Take out Rudolph's face

-
Open it up and fold the ears down

-
Fold it in half again

-
Apply glue to the tab

-
Turn the face upside down
-
Apply glue to the tab on the other side

-
Position the tab inside the box on the right as shown

-
Close the card, and press down where the tabs are

-
When you open the card, Rudolph's face should be aligned, coax into position if necessary

-
Take out a piece of scrap paper
-
Apply glue to one side of the red ring

-
Place the red transparent dot on top

-
Turn it over and remove any excess adhesive from the front

-
Fold it in half along the score lines

-
Apply glue to the top of the nose

-
Place the dot on top of the nose, aligning the center folds
-
Locate the switch on the right side, and test the light again (yay!)

-
Apply glue to the small red dot

-
Place the dot over the center of the switch

-
Press the button to see Rudolph's nose light up!
-
After waiting for all glue to dry, close the card

-
Place it in its envelope

-
Give it to someone you love!


