

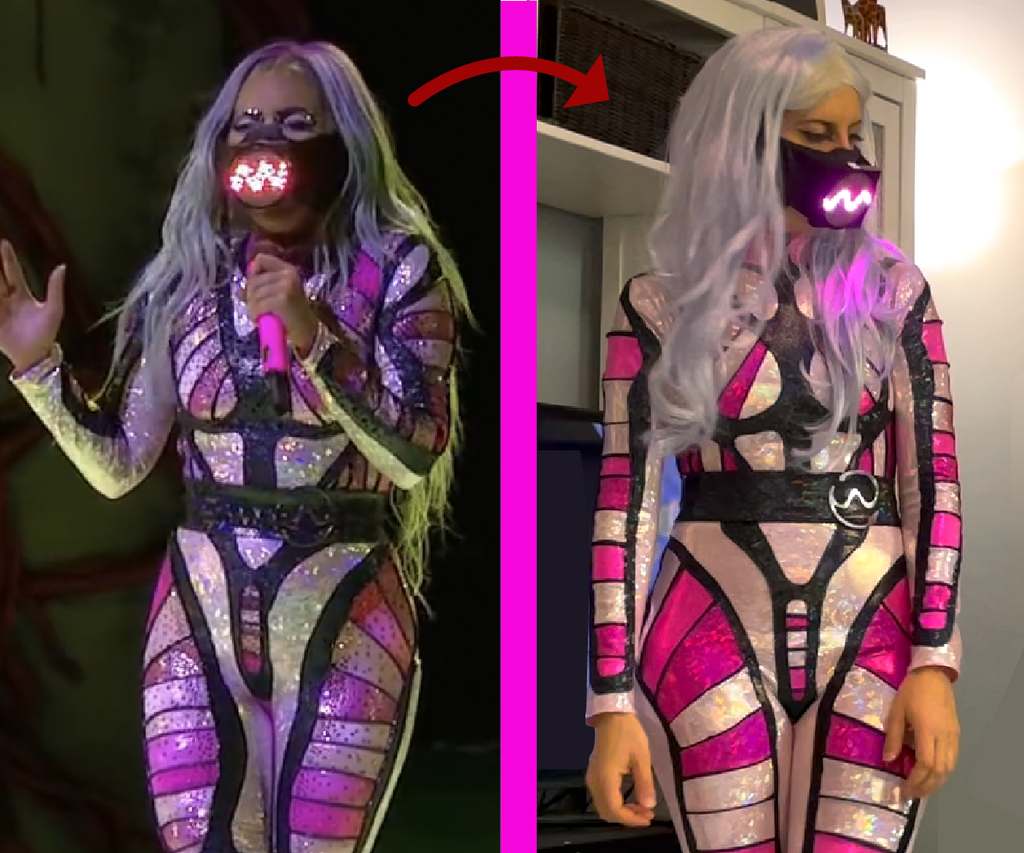

When I saw Lady Gaga's costume at the 2020 VMA's, I was in awe.
I thought this was simply the most beautiful costume ever- It's the perfect balance of techie and organic, futuristic and feminine, and it was hot pink - but instead of being 'girly', it was powerful. With Halloween coming up, I quickly decided on it as my Halloween costume!
This project also represented two personal goals: I wanted to learn how to sew Spandex, and how to code an LED matrix. This was the ultimate way to "level up" both of these skillsets.
In this tutorial, I'll share how I made the spandex bodysuit and what I learned along the way. I will post more about making the LED matrix mask and the wig soon, so please stay tuned.
In addition to my costume, we decided that my boyfriend Matt should go as Lady Gaga's "Brain Piano" as seen in the video. Matt is an ex-Apple Store 'Genius' and has been playing piano since he was very young, so it seemed appropriate. :-p I'll post more about his costume soon as well!

Materials & Supplies
- Off-The-Shelf Pink Unitard (that fits the costume wearer), for template
-
Spandex Material
- Light Pink
- Black
- Medium Pink
- Hot Pink
- Matching Thread & Needles
- Sewing Pattern Paper
- Small clips, clothespins, or sewing pins
- Craft Plastic
- Masking tape
- Sewing Machine with walking foot (example)
- Fiskars Detailed Cutting Set (18mm rotary cutter and mat)
- Washable Glue Stick
- Sharp sewing sheers (I just got these Gingher 8-Inch Sheers - I love them!)
Step 1: Research, Sketch & Get Fabrics
- I started by creating a sketch in the Procreate app on my iPad. I was able to paste some screenshots from the video for reference so that I could see the costume from different angles.
- I drew the style lines onto a body template and created masked layers to draw in the fabric texture for each of the color blocks.
This step may seem unnecessary, but it helped me really organize my thoughts and understand all of the costume's many pieces. I was able to go shopping with exactly what I needed in mind. I highly recommend doing a planning sketch like this!

Step 2: Test Fabrics & Stitches
After purchasing the fabric, I did many tests to choose the best stitch for the fabric. I needed to use a stretchy stitch on my sewing machine -- I tried ALL of them. I ended up going with stitch "17" (pic 3) because it gave me enough stretch and kept the seam in a nice, straight line.
*** I was nervous about working with spandex because it is notoriously hard. I found it to be easier than I thought, and I think that is largely due to the fact that I have a walking foot on my machine. This foot has little feet that feed the top fabric through in the same way that the feed dogs do to the bottom fabric. This way, I didn't end up with mismatched, warped seams. Hooray!


Step 3: Put on Unitard and Mark All Design Lines
- I put on the unitard and used a sharpie marker to draw the style lines onto the fabric, referencing my sketch as I drew.
- I only drew on half of my body because everything would be mirrored on the other side.
- I smoothed and connected the lines on my back once I took the unitard off.
Did I get sharpie on my skin? A bit, yes! Did I care? No!


Step 4: Disassemble Unitard
- Next, I cut the unitard apart at all the seams, making sure I was cutting at exactly the seam line.
- I cut the zipper out with about 1.5 inches of fabric around it to use later in the final design (when you have a zipper, use it!)


Step 5: Make Templates Using Pattern Paper
- I traced all of the pieces onto pattern paper to preserve their shapes for the final bodysuit and added a 3/8 in seam allowance.
- I changed the pattern to make the neck a bit lower because the unitard was a bit tight around my neck, and the Gaga costume also had a slightly larger turtleneck, so that worked out perfectly.


Step 6: Make Appliqué Templates
- With the main pieces of the pattern traced, I connected the parts that had been separated by a seam and traced the appliquè shapes onto pattern paper.


Step 7: Cut Out Black Outlines
- Because the black outlines were so small and intricate, I ended up tracing the design onto a piece of clear craft plastic to use as a template with more structure.
- I used a metallic sharpie on the back of the fabric to trace the shape, and cut it out with a small rotary cutter.


Step 8: Cut Out Pink Stripes
- To make the pink stripes, I cut the pattern paper apart at each stripe mark. I then cut the shapes out of the fabric, adding a 3/8 inch seam allowance on each side.
- The outer edge of these shapes matched the outer edge of the black outline to make aligning the pieces easier later.

Step 9: Sew Black Horizontal Stripes
- I cut many, many, strips of black fabric, folded them in half, and sewed them together to create the black stripes between each of the pink stripes.


Step 10: Sew Stripes With Black Lines In-between
- I aligned and sewed each of the pink stripes together, placing a black stripe within each seam.


Step 11: Sew Black Outlines to Striped Panels
- I taped the black outline shape to the template and the table with the wrong side up to hold it still.
- Then, I used a children's washable glue stick to temporarily glue the striped pieces in place.
- I sewed along the inner edge of the black outline.
- I trimmed the excess fabric to reduce bulk.


Step 12: Repeat on All Other Appliqué Shapes
- I repeated this technique for all of the other appliquè panels. It was A LOT. Over 100 panels. Phew!


Step 13: Sew Panels to Front of Bodysuit
- With all of the panels ready, I temporarily glued them in place using the same method as before.
- I stitched around the outer edge of the black outlines to attach the appliqués, making sure I didn't get too close to the outer seam allowance.


Step 14: Assemble Back of Bodysuit
- I used the zipper that came with the unitard and installed it into the bodysuit by sewing the zipper fabric to the bodysuit fabric. The zipper came out a bit wobbly, but when I tried it on it straightens right out.
- I sewed the back seam.


Step 15: Sew the Front and Back Together
- I sewed the front and back of the bodysuit together, making sure to pin the appliquès that extend over the seam inside so that they wouldn't get caught.
- I tried it on to make sure I was on the right track - and it fit!


Step 16: Sew the Collar
- I cut a long strip of pink fabric for the collar and folded it in half, sewing both edges into the neck seam.


Step 17: Add the Arms
- To add the appliquès to the arms, I cut the applique markings out of the arm templates and used the hole as a guide to glue the appliquès in the right place.
- I sewed the arms to the main bodysuit.


Step 18: Add the Belt & Make It Useful
- I made a tube of black fabric for the belt and sewed it to the bodysuit on either side of the zipper at the back.
- I added an additional vertical line of stitches to take advantage of the stretchy fabric's ability to grip a battery pack that would power the LED mask.


Step 19: Add the Chromatica Symbol
- I cut Lady Gaga's Chromatica symbol from metallic paper and glued it to the belt.


Beth
on June 7, 2021 13:20
Oh my word, this is amazing!