Spray Painted Pine Cone Wreath DIY
As city dwellers, this project was SO MUCH FUN. We rented an Air BNB in the Poconos, PA, and picked our own pinecones to make wreaths for our family as a Christmas present. We collected, baked, spray painted, glittered, and glued the wreaths together.
As an Amazon Associate, I earn a small commission on purchases made through the links below, and that helps me make more tutorials like this. :)

Supplies:
- Pine Cones From the Wilderness (Or if you don't have wilderness, these should work)
- Spray Paint - GOLD NC-Acrylic Silver
- Spray Paint - GOLD NC-Acrylic Deep Forrest Green
- Spray Paint - GOLD NC-Acrylic Shock Red
- Aluminum Foil & An Oven
Tools:
Step 1: Gather & Bake Pine Cones
- Go outside! Hike around and find some pine cones. We found tons on our hike in Pennsylvania. We brought a reusable shopping bag to carry them back and we filled it up!
- To prepare the natural pine cones for our craft, we lined the oven rack with tin foil and baked them in the oven at 200 degrees for about 4 hours (we kept an eye on them to be sure they didn't catch fire!). It took a long time because we had so many - but we knew they were ready once they spread their petals out and the insides were dry.
- Side note: some people recommend soaking pinecones in vinegar before baking to kill more bugs/mold. We skipped this step and they turned out fine, but I thought I'd mention it in case you'd like to try that too!


Step 2: Prepare for Spray Painting
- We added wooden skewers to the bottoms of each pine cone with hot glue and stuck them into a foam cone leftover from another project.
- We placed it on top of a plastic turntable (typically sold for cake making) with a piece of protective craft paper on top to make it easy to rotate the pinecones around and spray all the angles.
- We placed it in a spray shelter to spray (because we live in a city and don't have access to outdoor space) but if you do, go outside! It will be way easier!


Step 3: Spray It, Spray It Everywhere!
- We sprayed the cones all over with red spray paint, rotating the turntable to make sure we were covering all over.
- We repeated this process with green and silver spray paint as well.
- We left about half of the pine cones natural colored to add to the rustic look of the wreath.


Step 4: Glue & Glitter
- We added white glue to the tips of the pine cone petals and sprinkled glitter over them, catching the excess glitter in a bowl below.
- Alternate method: You can also 'dip' the pine cone in a tub of glitter - but beware! this may result in globs of glue falling into the glitter, and you will end up with globby glitter that is annoying to re-use. I do not enjoy globby glitter, so I don't do it that way. :-p


Step 5: Repeat
- We repeated the glittering on all three colors of pine cones using glitter that matched the paint color.


Step 6: Glue the Pine Cones to the Wreath
- Using hot glue, attach the pine cones to the wreath. We trimmed the skewers when needed, and used some of them to stick into the wreath.
- We created a balance of each color throughout the design.


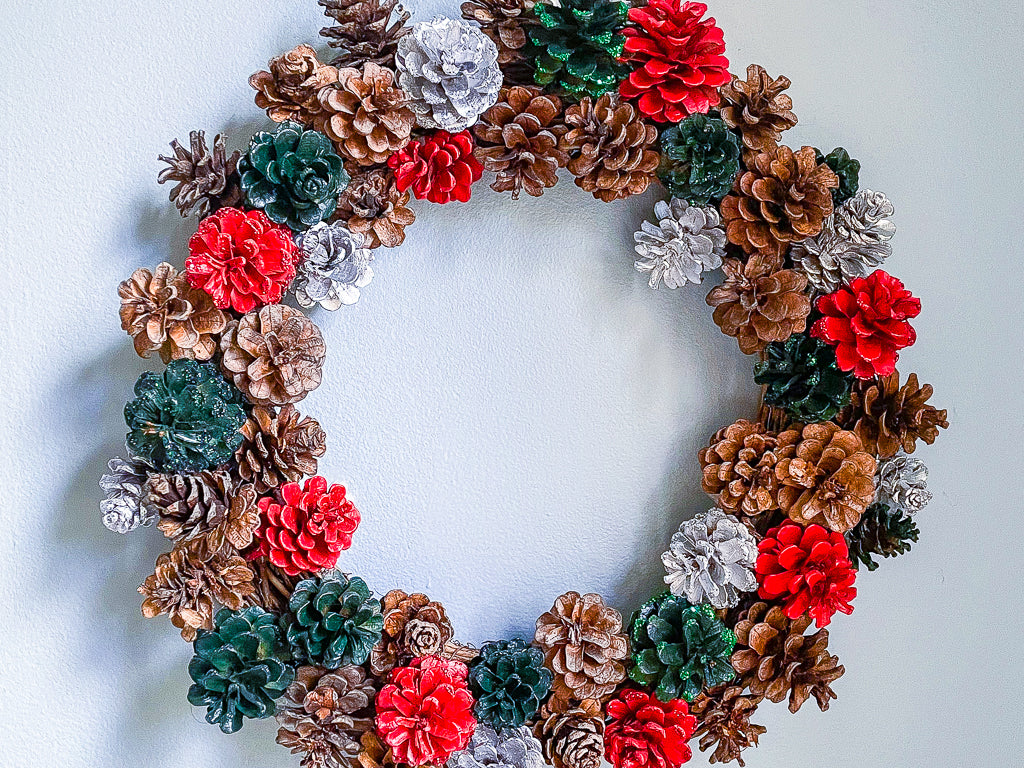
Step 7: Finish It Up
- We kept going until the wreath was covered, but this design would also look nice with some of the grape vine wreath left uncovered.


Step 8: Decorate!
- All done! Time to give the wreath as a gift or hang it somewhere special.