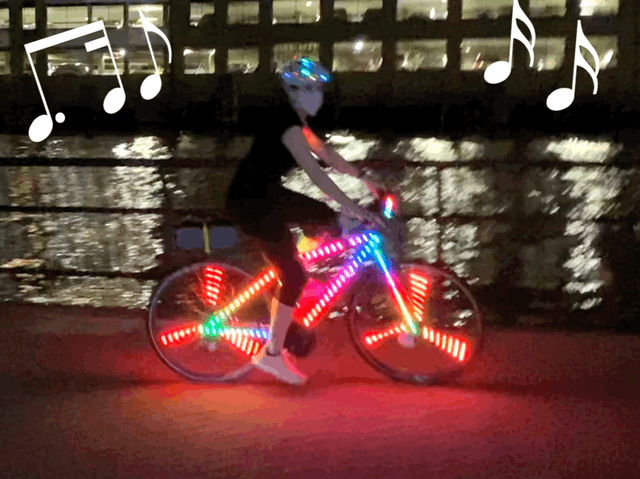
A spectacle of bike lights.
My goal is to make a music responsive LED NeoPixel light display for my bike. I'm a part of a group of bicycle enthusiasts in downtown Jersey City (Yeah BikeJC!) and we go on light-up night time bike rides in the summer with hundreds of cyclists.
It's about time that I use my hacking skills for a bike project! This starts now.
Project Plan
There will be several light-up rides this summer, so I'm working towards making this project in stages:
- Stage 1: Place the NeoPixels onto the bike Get the lights doing something cool!
- Stage 2: Create a controller for my handlebars so that I can change/choose the animations on the fly while I'm riding.
- Stage 3: Connect lights to the wheels and get them working in sync with the lights on the frame. This will require some wireless communication. I'm thinking of using BLE boards.
- Stage 4: Create animations that react to music so that my bike will become and awesome music visualizer!
- Stage 5: Keep brainstorming new ideas!
- Themed animations
- Lights on my helmet
- Lights on my clothing too!
- LED sign on the back
- Gigantic "Boom Box" prop for the back that lights up
- & so much more.
Tech - What boards should I use?
I'm thinking of using an Arduino Nano 33 IOT as my main microcontroller on the frame because it has the ability to become a BLE Peripheral device. Then, because I already have two BlueFruit Feathers, I'll put those in the wheels. Hopefully I can get them to connect as central devices to the Arduino set up as the peripheral. In this article, the "Notify" command seems to be what I will need to stream data to the wheels over BLE.
Here is the info on the Arduino BLE Library
For stage 1, I'm not worrying about BLE yet, but I'm thinking ahead so that I hopefully won't have to change out the microcontrollers. Hopefully.

Stage 1: Place the NeoPixels onto the bike
I'm designing a system to connect the LED NeoPixel lights to my bike in a way that will be durable but also easy to remove (I park my bike outside in the city so I can't leave the lights attached to the bike at night).
I ordered 10 meters (2 packs) of WS2812B LEDs from Amazon - I chose to go with the waterproof kind in case I get caught in the rain while riding. I also got some U-Shaped mounting channels from Home Depot to keep the lights straight. (You can also get them on Amazon without the ugly mounting tape). This not only will look more uniform but also allow me to attach and detach the lights easily without the light strips curling up into a ball of spaghetti between uses.


First, I measured the bike to see how many LEDs I would need - I needed to multiply my measurements by 2 to have the lights on both sides of the bike! I chose to go with the 30LED/meter strands to cover the the bike but not have too many LEDs that would draw too much power.
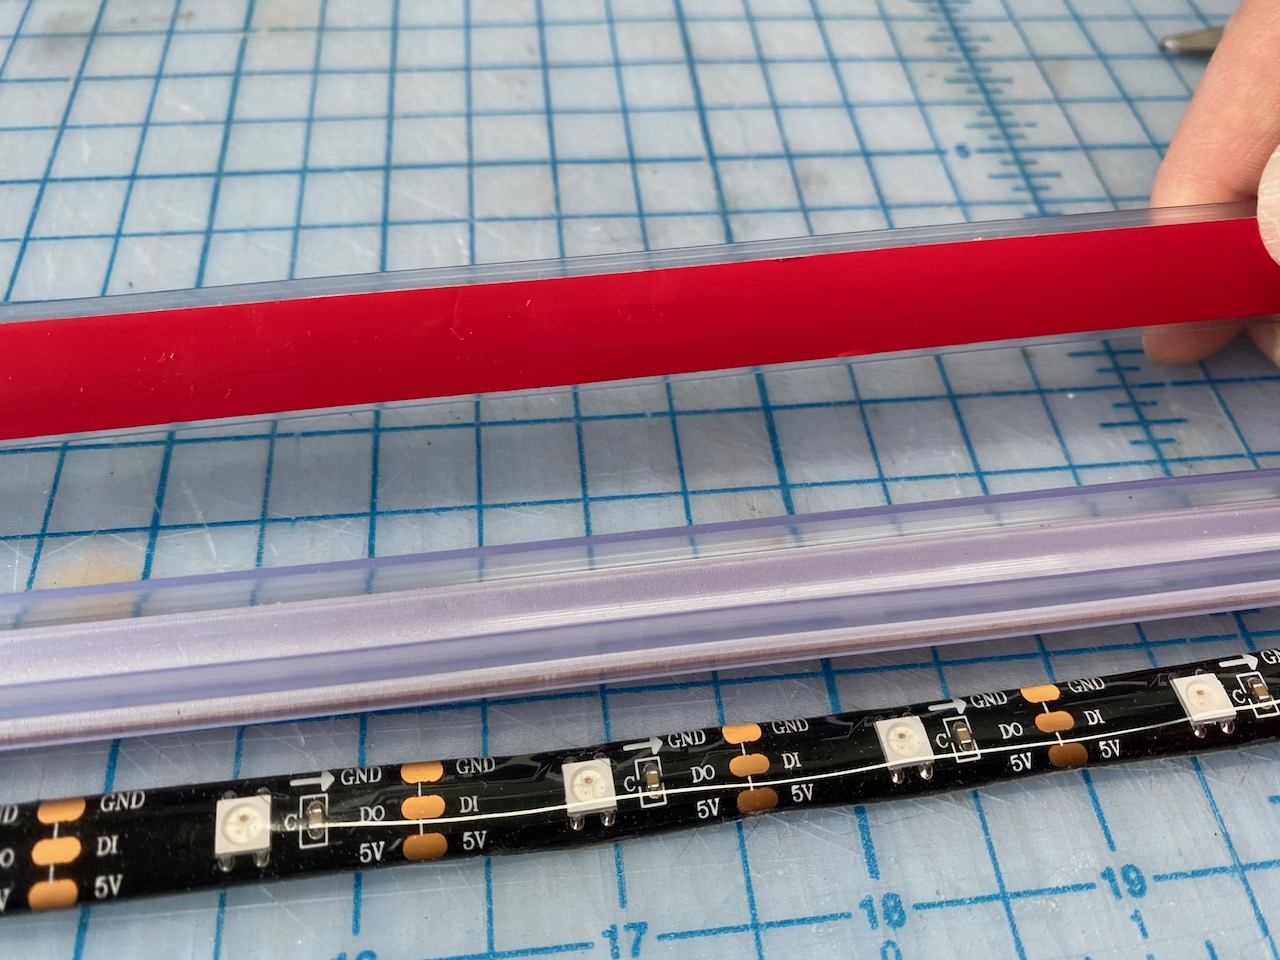
The mounting channels from Home Depot were meant for rope lights, but they worked quite well for the LED strips too. I wanted the lights to be nice and straight so that the animations had a really crisp, geometric effect. The channels will also make it easier to attach and detach the lights.

I soldered some 3-wire cable to make joints in the LED strands.
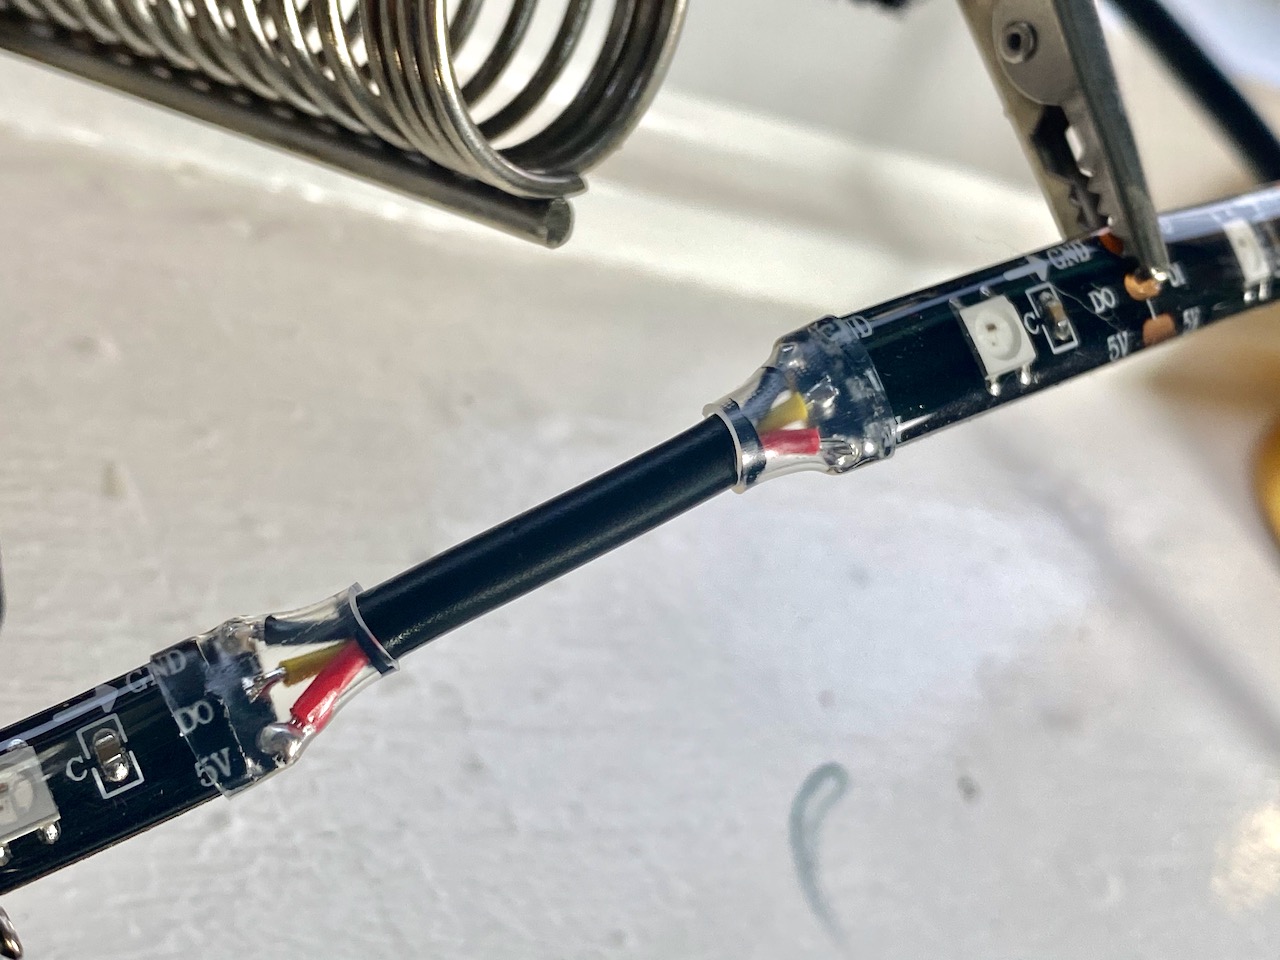
I added heat shrink around my joints.

Then I cut the plastic channels to size, inserted the LEDs, and added larger heat shrink over the ends - this will hold it in and hopefully reinforce the solder joints even more.


The LED strips fit nicely, but still had the ability to fall out. To make them extra secure, I added a band of large heat shrink around the whole stick about every 8 inches to make sure everything stays in tact. I also removed the red backing from the double stick tape and replaced it with black electrical tape. This was purely aesthetic - I didn't like that you could see the red on the back of the sticks.
I used velcro cable ties to attach the lights to the bike and threw some example code on them from the fastLED Arduino library. Now I can play with the code. :)
Stage 2: Create a controller
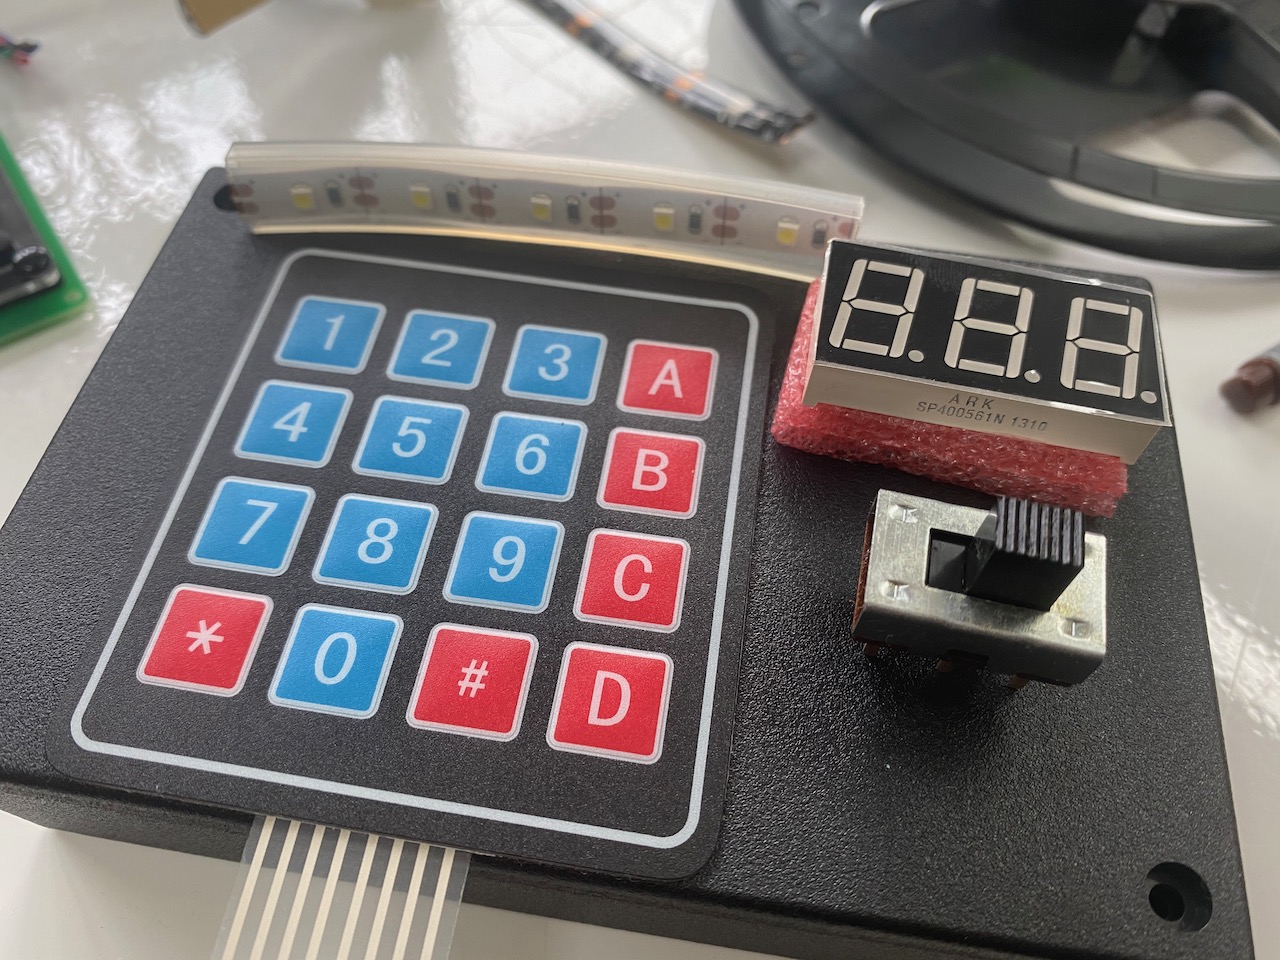
I'm designing a way to change the NeoPixel animations while I'm riding my bike. This number keypad is perfect because I can have lots of options - 16 to be exact. It would be fun to have some of the buttons change the pattern and some change the colors. Once I create the animations, I'm planning to make a graphic to cover the controller pad with illustrations to help me remember what button does what.
Other considerations are:
- An on/off Switch for the whole project
- I could have a 7-segment display to give me feedback about what mode I'm currently running
- Or, A strip of NeoPixels could give me this feedback too
- An LED strip to illuminate the keypad (we ride at night). I have some 5V white LED strips that would work here, and I could engineer a cover or something so they don't shine in my eyes.
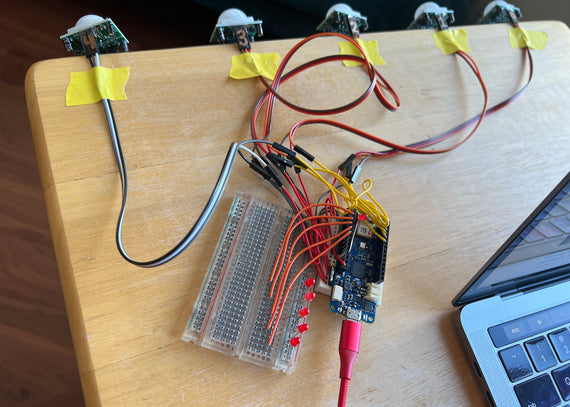
- ...And the Membrane 4 x 4 Matrix KeyPad, like this 3 x 4 version.
The keypad can be controlled by the Adafruit Keypad library. It was simple to set up. Here's the tutorial I followed to do so.
My previous NeoPixel projects have all been something like: "press a button and then an animation sequence will play."
Simple.
But what happens when you want to change the animation while the NeoPixel animation is playing? The way I had been coding it, if I pressed a button while an animation was playing, it would continue to play the animation until the end before anything would change. So I was dreading figuring out how to fix this.
But then I found this:
(cue angelic "Ahhhhh!" music sound effect)
This "Multi-tasking the Arduino" tutorial was exactly what I needed. The code was pretty different from what I do but it's well explained and the full code is provided with an example circuit to try.
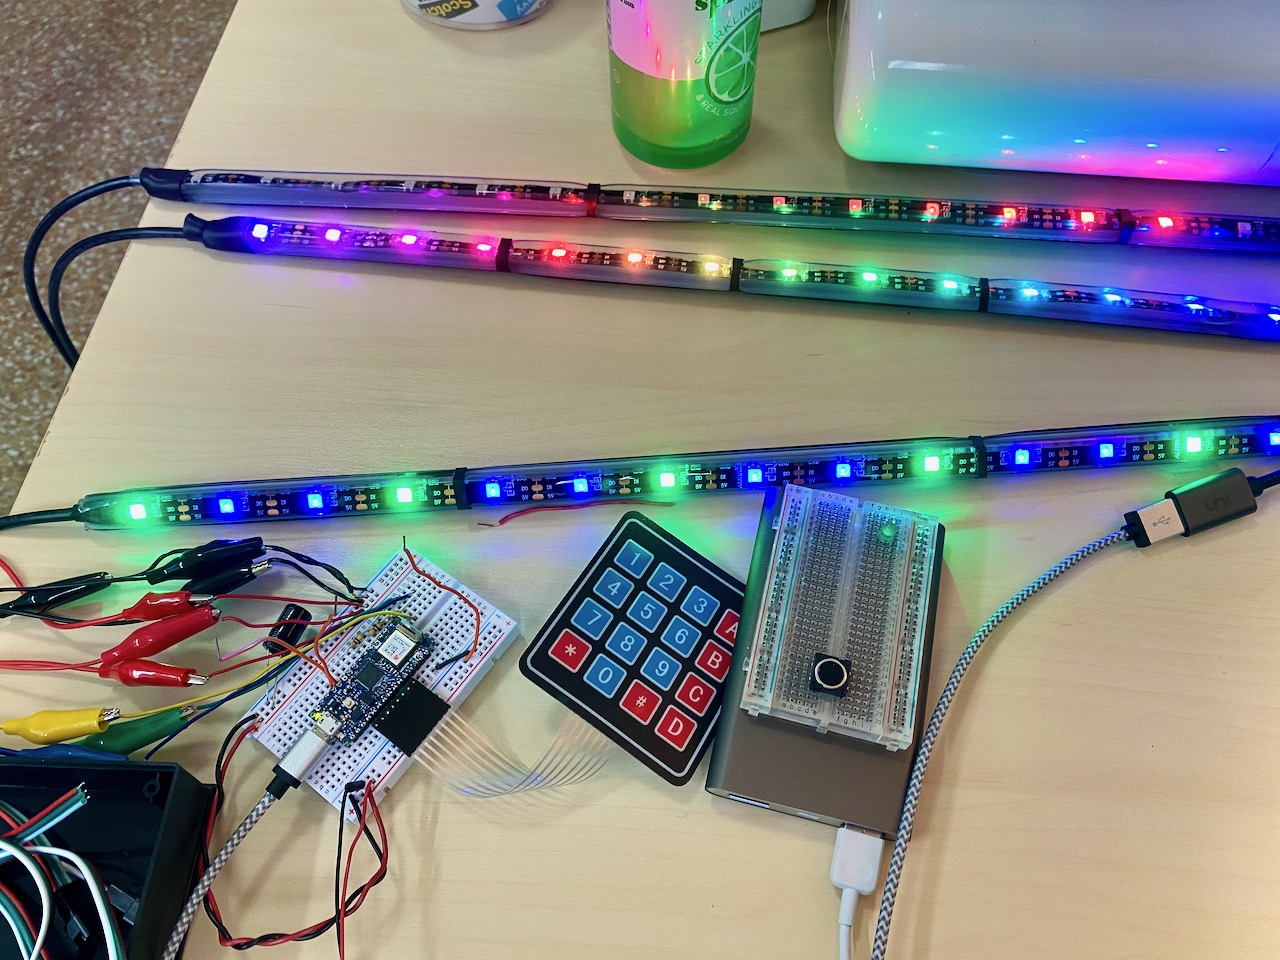
I modified the example to work with three of the NeoPixel strips from my bike. I incorporated the KeyPad using the Adafruit Keypad library instead of the buttons in the example too.
I was so excited that it worked! I thought this was going to take forever to figure out and I was up and running in no time. Yay!
The next step is to play with the animations and what happens when I press each of the buttons on the KeyPad. I'm so excited to have gotten to the fun part so quickly. :)
Below you can see the example code using two NeoPixel rings and a stick, and then my use of the same example with 3 NeoPixel strips and the keypad.

First Ride!
We had a light-up bike ride last night and I debuted the project!
I learned a lot from my own "user testing":
1) Power. The power usage was AMAZING. I rode for over 3 hours and used less than 25% of my 10,000mAh battery pack. After all I had read about needing to conserve power for the Neopixels, I was happy that this isn't going to be an issue for this project. My bike frame has 180 Pixels.
2) Interaction. I originally thought that I wanted to use some of the buttons on the number pad to choose a pattern, and different buttons to choose a color scheme. (For example, I would need to press 2 buttons to set what I wanted - first pattern, and then color.) I ended up coding it so that each button press would set BOTH a color and a pattern, and I saw how much of a necessity this was once I actually rode the bike. I need to be focusing on the road and not on manipulating the controls. For this project, changing lights needs to be a "one and done" sort of interaction - for safety's sake.
3) Modularity. It was really easy to take the lights off the bike after the ride - I simply unplugged the cables, unstuck the velcro, and wrapped the velcro strips around for storage. It was a lot of extra work to make the sticks so easy to add and remove, so I'm glad it paid off.
Next up - Bluetooth and wheel lights!
Stage 3: Adding Wheel Lights & BLE Communication
I had two Adafruit Feathers and a Arduino Nano 33 IOT. My original thought was that I would use the Feathers in the wheels and the Nano as the main controller and connect them over bluetooth.
Then my brain got tied in a knot.
To do this, I would have to use two different BLE libraries. And I bet it's possible, but definitely not simple. So I ordered two new Arduino Nano 33 IOT Boards to use in place of the Adafruit Feathers.
This project is getting pricey, but my sanity is priceless!
Coding in English, A "Code Play" (Screen Plays are for Screens, duh.)
Meet the Characters:
Controller Board has a number pad full of options - 16 to be exact, and they are ready to be pressed. She's got 180 Neopixels ready to switch into these 16 modes, and a direct line of communication to her Wheel Boards.
Front Wheel Board and Rear Wheel Board are identical twins, distinguishable only by their unique names, (given by their mother at birth) and a few alternate color choices that prove that it's a combination of nature and nurture that make us who we are. They are jam packed with animations that they can play on their 42 NeoPixels, but they need to listen to Controller Board to know what to play.
How will Front Wheel Board and Rear Wheel Board find a path of communication and connection to Controller Board? What will they say to each other? Will their relationship grow or end in a nasty divorce? The story begins on a dark, hot summer night, perfect for bike riding:
--
Controller Board: Hey Wheel Boards - I know what mode we're in!
Front Wheel Board: Controller board has information about what mode to be in! I want to subscribe to that! I'm all ears!
Rear Wheel Board: Controller board has information about what mode to be in! I want to subscribe to that too! I'm all ears!
Front Wheel Board: First!
Peripheral Controller Code (not yet working)
Central Receiver Code (not yet working)
I still haven't cracked the code for communicating with 3 Arduino Nano 33 IOTs. So, I moved on to working on the music reactive part, and I'll come back to BLE when I can.
Stage 4: Adding Music Reactive Visualizations
To create the music reactivity, I thought I might use a microphone and amplifier like these from Adafruit. BUT, then I remembered that I will be riding my bike outdoors and microphones and wind are not friends.
I came up with a solution using an old headphone splitter. You can see my setup in this video:
I found some code on Github that created a simple rainbow animation based on the voltage of the audio signal. This was a perfect start to get me up and running with my setup.
Here it is in action!
I'm excited to play with creating some of my own animations. That's next on the list!